1/72 Wet Decals - Aichi D3A1 "Val"


Type: water-slide decals
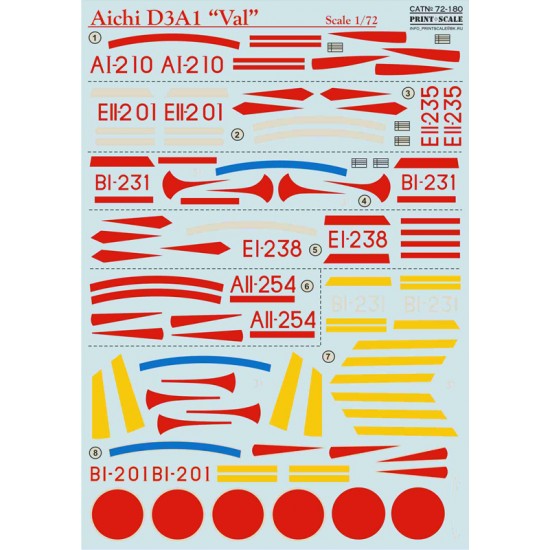
1. Aichi D3A1 Model 11 Unit/Location: 1. Koku Sentai, Carrier Akagi, Pearl Harbor, 07.12.41.Code: Red AI-210 Pilot: Zenji Abe.
2. Aichi D3A1 Model 11 Unit/Location: 5. Koku Sentai, Carrier Zuikaku. Pearl Harbour 07.12.1941. Code: Red EII-201, Pilot: Akira Sakamoto.
3. Aichi D3A1 Model 11 Unit/Location: 5. Koku Sentai, Carrier Zuikaku, Coral Sea, 07./08.05.1942. Code: Red EII-235. Pilot: Tamotsu Ema. Ema participated in the sinking of destroyer "Sims", Oiler "Neosho" and damaged carrier USS Yorktown. Ema survived the pacific war.
4. Aichi D3A1 Model 11 Unit/Location: 2. Koku Sentai, Carrier Soryu. Pearl Harbour, 07.12.1941 .Code: Red BI-231, Pilot: Takashige Egusa.
5. Aichi D3A1 Model 11 Unit/Location: 5. Koku Sentai, Carrier Shokaku, 20.01.1942 at "Operation R" (Attack on Rabaul).Code: Red EI-238, Pilot: Kakuichi Takahashi. Observer: Saizo Koizumi.
6. Aichi D3A1 Model 11 Unit/Location: 1. Koku Sentai, Carrier Kaga, Port Darwin 19.02.42 Code: Red AII-254 Pilot: Takezo Uchikado. Observer: Katsuyoshi Tsuru. Uchikado and Tsuru were shot down and killed during the attack on Port Darwin.
7. Aichi D3A1 Model 11 Unit/Location: 2. Koku Sentai, Carrier Soryu, Indian Ocean/Ceylon Raid, 05.04.1942. Code: White BI-231, Pilot: Takashige Egusa. Egusa participated in this plane in the sinking of carrier "Hermes" and the heavy cruisers "Cornwall" and "Dorsetshire".
8. Aichi D3A1 Model 11 Unit/Location: 1. Koku Sentai, Carrier Hiryu, Midway 04.06.1942 .Code: White BI-201, Pilot: Michio Kobayashi. Observer: Ono Yoshinori. Kobayashi led the retaliatory strike from Hiryu to heavily damage carrier USS Yorktown before it got sunk by the B5N2 Torpedo-Bombers of Hiryu. He was KIA in this action.
How to apply water-slide decals:
1. Preparation: to achieve better result, a gloss or semi-gloss coat is very important. It will make a smooth layer which the decals will suction to and make it much easier to apply and set them.
2. Cut out the decal you need (do it on cutting mat)
3. Grab the decal with tweezers, place it on the surface of the water and leave it for about 20 seconds.
4. Remove the decal from the water and place it on paper towel to remove any excess water.
5. Apply decal solution to the part where the decal is to be placed.
6. Slide the decal off the backing paper on to the model. Using a paint brush or cotton bud is a good way to do this without damaging the decal.
7. Use the brush, knife or cotton bud to position the decal. Using your paper towel, gently dab the decal and soak up the excess water (decal softener is also recommended at this stage. After applying softener, the decal will suction to the part and flatten out smooth.)
8. When the decal is completely dry, give another coat of varnish or Klear/Future to seal it.
| General Info | |
| Scale | 1/72 |
| Type | Model Upgrade/Accessory |
| Subtype | Decals / Stickers |
- Stock: In Stock
- Reward Points: 20
- SKU: PRS72-180
- 2pcs in Stock

Print Scale Decals
MRP: US$17.09 Save: US$3.08
18% OFF
US$14.01
(excl. Tax)
"In-Stock" Really Means It
Combine Shipping & Save
SAME or Next day shipping*


There are no reviews
Maybe you can help? Many users will be grateful to you. And so are we.