1/72 de Havilland Tiger Moth Decals


Out Of Stock
Type: water-slide decals
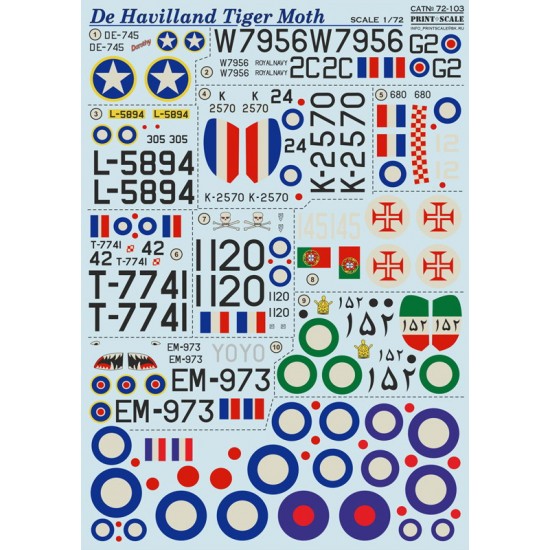
1. Tiger Moths "Dorothy"of US Army Air Force were used on British territory to Iiaison duties. DE 745 was flown by 353rb Fighter Group USAAF in summer 1943 and it retained British camouflage with American insignia modified from the British ones.
2. Tiger Moth Mk 1946-1950rr.
3. Radio-controlled target DH.82B Queen Bee undergone similar development of paint scheme as Tiger Moths of RAF. L5894 machine with sequence number 305 on the cowling was used by No.1 Anti Aircraft Co-operation.
4.First to the RAF delivered DH.82 with K 2570 designation (to the end of 1931) in all-silver colour served with 24 Communication Squadron at Hendon. Black unit number on both fuselage sides.
5. Distinguished by fuselage ring of red-white chequer were Tiger Moths of No. 28.EFTS at Mount Hampden (South Rhodesia).With the aircraft bearing sequence number ?12" the pupil landed on the back of another plane and both ground-looped without serious injury to the pilots on May 14, 1942.
6. Yellow contrasting colour marking on the fuselage, cowling and wings appeared on RAF training aircraft since the end of 1943. Tiger Moth ll T7741 serving with No. 25.Polish EFTS until November 10th, 1944 when after the mid-air collision with another ?Tiger? near Hucknall airport crashed beyond repair.
7. Czechoslovak student pilots from the first courses in No. 31 EFTS in Canadian De Winton to the end of 1942 met also this DH.82C No.1120, whose black cowling was decorated by the drawing of skull with crossed shanks on place of usual white sequence number.
8. DH.82A No. 145 Sintra, Portugal, 1939.
9. DH.82 Tiger Moth, No.152 Some specimens were produced in the lranian aircraft factory, Shahbaz 1932.
10. Tiger Moth ll EM 973 was used by Canadian 401 Squadron with unit code combination in 1943. Shark?s jaws showed it?s teeth on the cowling.
How to apply water-slide decals:
1. Preparation: to achieve better result, a gloss or semi-gloss coat is very important. It will make a smooth layer which the decals will suction to and make it much easier to apply and set them.
2. Cut out the decal you need (do it on cutting mat)
3. Grab the decal with tweezers, place it on the surface of the water and leave it for about 20 seconds.
4. Remove the decal from the water and place it on paper towel to remove any excess water.
5. Apply decal solution to the part where the decal is to be placed.
6. Slide the decal off the backing paper on to the model. Using a paint brush or cotton bud is a good way to do this without damaging the decal.
7. Use the brush, knife or cotton bud to position the decal. Using your paper towel, gently dab the decal and soak up the excess water (decal softner is also recommended at this stage. After applying softner, the decal will suction to the part and flatten out smooth.)
8. When the decal is completely dry, give another coat of varnish or Klear/Future to seal it.
| General Info | |
| Scale | 1/72 |
| Type | Model Upgrade/Accessory |
| Subtype | Decals / Stickers |
- Stock: Out Of Stock
- Reward Points: 14
- SKU: PRS72-103

Print Scale Decals
MRP: US$11.30 Save: US$1.99
17% OFF
US$9.31
(excl. Tax)
"In-Stock" Really Means It
Combine Shipping & Save
SAME or Next day shipping*


There are no reviews
Maybe you can help? Many users will be grateful to you. And so are we.