1/48 Junkers Ju-87 Stuka Decals (complete set, 2 leaf)


Type: water-slide decals
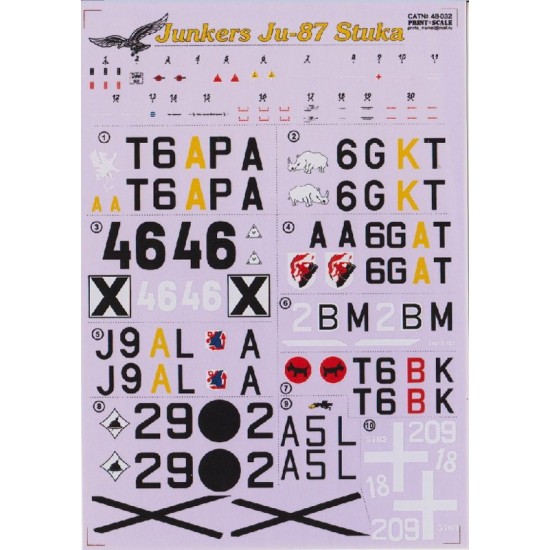
1. Junkers Ju-87 R-2 T6+AP flown by Staffelkapitan of 6./St.G 2 ?Immelmann?,Summer 1940. Standard splinter scheme of RLM70, 71 and RLM 65.
2.Junkers Ju-87 R-2, 6. St.G 1, 6G+KT, Mediterranean Theatre, early 1941. Apart from the unusual emblem on the nose, this aircraft featured the normal 70/71/65 scheme with a white fuselage band centred on the Balkenkreuz.
3. Junkers Ju-87 D-5,J9+AL of 2 Pulk Szturmovy, Royal Bulgarian Air Force. Anti-partisan operations, Summer 1944. RLM 70/71/65 finish.
4. Junkers Ju-87 B-1 of 6./St.G 1, France 1940.Finished in a standard 70/71/65 splinter scheme.
5. Junkers Ju-87 B-1,J9+AL of 1.(St.)/Tr.Gr.189, France, May 1940. RLM 70/71/65 finish. The type of exhaust stacks suggest that this machine is late production series.
6. Junkers Ju-87 D-3, 4./St.G 2, Stalingrad. September 1942/February 1943. Standard scheme 70/71/65.
7. Junkers Ju-87 D-5, I./Sg 2 ?Immelmann?, Russian Front, Whinter 1943-1944. Standard scheme 70/71/65, covered atop with white stains.
8. Junkers Ju-87 A-1, 29 2 of Kampfgruppe 88, legion Condor, Spain 1938
9.Junkers Ju-87 B-2/trop, III/St.G 1, North Africa, 1941. This aircraft was captured by British troops in November 1941, before the Germans had finished applying the aircraft?s individual code letters - note the incomplite ?H? after cross.
10. Junkers Ju-87 B-2 of 209 Squadriglia, 96 Gruppo, Libia, September 1941. The camouflage on this machine was the standard German 70/71/65 scheme but with appropriateRegia Aeronautika national insignia and the nose and the Squadriglia number 209 in white. A white band encircled the rear fuselage band, and the nose and spinner were in yellow.
How to apply water-slide decals:
1. Preparation: to achieve better result, a gloss or semi-gloss coat is very important. It will make a smooth layer which the decals will suction to and make it much easier to apply and set them.
2. Cut out the decal you need (do it on cutting mat)
3. Grab the decal with tweezers, place it on the surface of the water and leave it for about 20 seconds.
4. Remove the decal from the water and place it on paper towel to remove any excess water.
5. Apply decal solution to the part where the decal is to be placed.
6. Slide the decal off the backing paper on to the model. Using a paint brush or cotton bud is a good way to do this without damaging the decal.
7. Use the brush, knife or cotton bud to position the decal. Using your paper towel, gently dab the decal and soak up the excess water (decal softner is also recommended at this stage. After applying softner, the decal will suction to the part and flatten out smooth.)
8. When the decal is completely dry, give another coat of varnish or Klear/Future to seal it.
| General Info | |
| Scale | 1/48 |
| Type | Model Upgrade/Accessory |
| Subtype | Decals / Stickers |
- Stock: In Stock
- Reward Points: 27
- SKU: PRS48-032
- 1pcs in Stock

Print Scale Decals
MRP: US$22.57 Save: US$4.20
18% OFF
US$18.37
(excl. Tax)
"In-Stock" Really Means It
Combine Shipping & Save
SAME or Next day shipping*


There are no reviews
Maybe you can help? Many users will be grateful to you. And so are we.