1/32 P-40K Warhawks Part 1 Decals


Discontinued
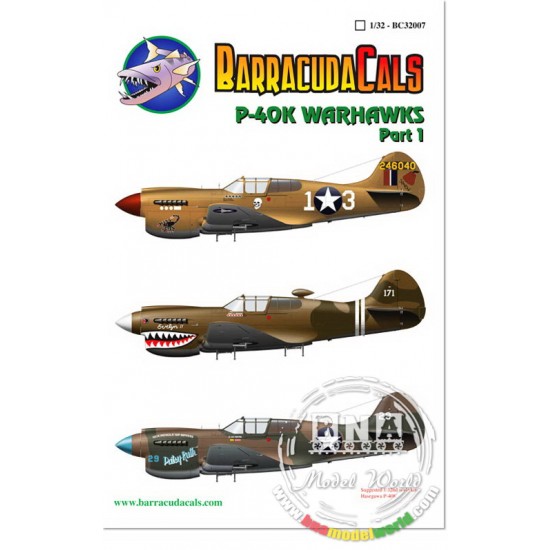
Curtiss P-40K Warhawk "White 13"
64th FS/57th FG. Flown by 1st Lieutenant Robert Johnson "Jay" Overcash
Based at Hadi Main, Tunisia. May, 1943.
Overcash final score was 5 victories, the last two flying White 13 on April 26th,1944, while escorting USAAF B-25s and RAF Baltimores on a bombing mission. Finished in very worn and matt AAF Sand over Neutral Gray, from being scoured by the abrasive desert sand. Area behind rear glass panels could be faded OD or Sand. Spinner is a dull red, rectangle on fin and rudder behind serial number is Olive Drab. Prop blades black with 4" yellow tips. Mainwheel hubs appear to be upper surface color.
Curtiss P-40K-1 Warhawk "White 171"
75th FS/23rd FG; Flown by Major Elmer Richardson
Hengyang, China. Late 1943
Elmer Richardson scored eight victories between April 1 and Dec. 12, 1943, and completed his combat tour as the commanding officer of the 75th FS with the rank of major. He made a career in the USAF and retired as a colonel. This P-40K is finished in sun faded Olive Drab over Neutral Gray. Note areas of darker, fresh OD on the rear fuselage and tail. Spinner is OD with a white tip. Wheel hubs are Neutral Gray with a white outer ring. Note DF Football behind canopy, second set of droptank shackles, rearview mirror, and extended trim tab on rudder.
Curtiss P-40K-1 Warhawk "White 29"
7th FS/ 49th FG; Flown by 2nd Lieutenant Arland Stanton
Port Moresby, New Guinea. March 1943
Stanton was an ace with 5 victories. His first was on November 23, 1942 and his last was on February 6, 1944. This P-40K is finished in weathered Dark Green and Dark Earth over Light Gray (DuPont equivalents). Spinner is OD with a blue tip. Blades are black with 4" yellow tips. Wheel hubs are Neutral Gray. Note ring and bead sight.
How to apply water-slide decals:
1. Preparation: to achieve better result, a gloss or semi-gloss coat is very important. It will make a smooth layer which the decals will suction to and make it much easier to apply and set them.
2. Cut out the decal you need (do it on cutting mat)
3. Grab the decal with tweezers, place it on the surface of the water and leave it for about 20 seconds.
4. Remove the decal from the water and place it on paper towel to remove any excess water.
5. Apply decal solution to the part where the decal is to be placed.
6. Slide the decal off the backing paper on to the model. Using a paint brush or cotton bud is a good way to do this without damaging the decal.
7. Use the brush, knife or cotton bud to position the decal. Using your paper towel, gently dab the decal and soak up the excess water (decal softner is also recommended at this stage. After applying softner, the decal will suction to the part and flatten out smooth.)
8. When the decal is completely dry, give another coat of varnish or Klear/Future to seal it.
| General Info | |
| Scale | 1/32 |
| Type | Model Upgrade/Accessory |
| Subtype | Decals / Stickers |
- Stock: Out Of Stock
- Reward Points: 14
- SKU: BAR BC-32007

Barracuda
MRP: US$11.30 Save: US$1.99
17% OFF
US$9.31
(excl. Tax)
"In-Stock" Really Means It
Combine Shipping & Save
SAME or Next day shipping*
There are no reviews
Maybe you can help? Many users will be grateful to you. And so are we.