Decals for 1/35 GD, 18.PzAbt, 11.PD, DR Panzer IVs (Ausf. F1/F2/G)


Out Of Stock
Water-slide Decals
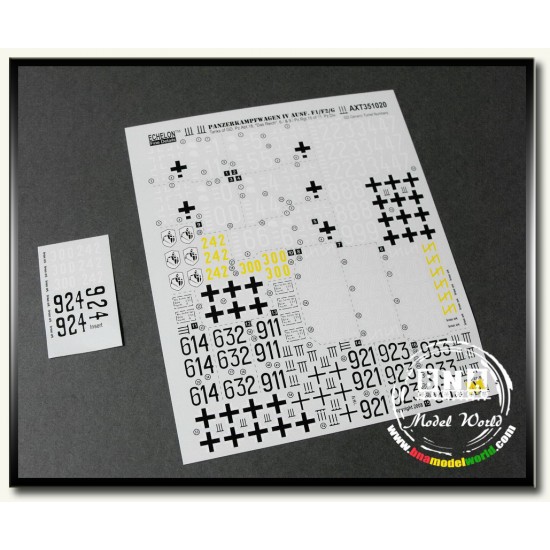
The first part of this set covers the famous Grossdeutschland Panzer IVs (Ausf. F1s & F2s). The promiment digits were not crudely hand-painted but clearly and very neatly applied (most probably stenciled).
While there is nothing new about the emblem of 18. Panzer Abteilung, research shows that the rear turret bins of the tanks also carried the marking. One photograph angle showed the turret numbers of a slightly darker shade than the whites of the Abt. emblem and the balkankreuz, hinting that the colour could very likely be yellow. Nevertheless, a spare set of white numbers are provided if you're not fully convinced of the yellow. Either way, an all-out attempt was made to capture the emblem of all it's detail and shape.
Das Reich fielded F2 models, mostly likely in 2-tone truppen schemes, with the lighter earth tone sprayed over panzer grey in random wavy patterns. Tank "321", while exhibiting features of a typical Ausf F2 model, was without vision slots on the turret.
Lastly but not last, the well known 6./ and 9./ 15.Panzer Regiment Ausf Gs from 11.Panzer Division in their full glory. The divisional signs in two sizes, some neatly painted, some in "broken" stencil, and also a number crudely painted. The digits are so stylised that it's unmistakably theirs. Interesting enough, "911" featured early war balkankreuz even though it was fully skirted! On some of the turrets, the railroad stencils clearly painted. "924" was the "maverick" of the whole lot, insisting on having it's own stylised turret numbers.
How to apply water-slide decals:
1. Preparation: to achieve better result, a gloss or semi-gloss coat is very important. It will make a smooth layer which the decals will suction to and make it much easier to apply and set them.
2. Cut out the decal you need (do it on cutting mat)
3. Grab the decal with tweezers, place it on the surface of the water and leave it for about 20 seconds.
4. Remove the decal from the water and place it on paper towel to remove any excess water.
5. Apply decal solution to the part where the decal is to be placed.
6. Slide the decal off the backing paper on to the model. Using a paint brush or cotton bud is a good way to do this without damaging the decal.
7. Use the brush, knife or cotton bud to position the decal. Using your paper towel, gently dab the decal and soak up the excess water (decal softner is also recommended at this stage. After applying softner, the decal will suction to the part and flatten out smooth.)
8. When the decal is completely dry, give another coat of varnish or Klear/Future to seal it.
| General Info | |
| Scale | 1/35 |
| Type | Model Upgrade/Accessory |
| Subtype | Decals / Stickers |
- Stock: Out Of Stock
- Reward Points: 10
- SKU: EC AXT351020

Echelon Fine Details
MRP: US$10.24 Save: US$3.43
33% OFF
US$6.82
(excl. Tax)
"In-Stock" Really Means It
Combine Shipping & Save
SAME or Next day shipping*

There are no reviews
Maybe you can help? Many users will be grateful to you. And so are we.